Capturing the Magic of Bryce Canyon: The Best Photography Spots
Bryce Canyon National Park is one of the most mesmerising landscapes in the American Southwest, rivalled only by Arches National Park in its ability to captivate visitors. Its otherworldly rock formations, known as hoodoos, rise in spectacular rows from the eastern rim of the Paunsaugunt Plateau, creating a scene that feels almost supernatural. Thanks to its proximity to Las Vegas, Bryce Canyon is easily accessible, drawing travellers and photographers from all over the world. While solitude may be hard to find, what you will discover is a landscape so vivid and surreal that it will leave you in awe from the moment you set eyes on it.
Unlike other national parks with diverse terrain and ecosystems, Bryce Canyon's main attraction is its amphitheatre of crimson, orange, and pink-hued spires. These formations transform under different lighting conditions, making the park a paradise for photographers. The key to capturing Bryce at its best is understanding the light - this is sunrise country. The park faces east, meaning the hoodoos glow most brilliantly in the early morning as the sun illuminates their intricate textures. Sunset, too, brings dramatic light, enhancing the deep reds and casting long shadows across the canyon.
To make the most of your visit, it's highly recommended to stay overnight in the park or at a nearby lodge so you can visit the park in the early morning hours and until sunset. Arriving early in the morning or staying until sunset will reward you with the best photographic opportunities. The Bryce Canyon faces east so sunrises are the best time to capture the beauty of this place. If time is limited, Sunset Point offers the quintessential Bryce Canyon view and should be your first stop. The Rim Trail between Sunrise, Sunset, and Inspiration Points is an easy walk that provides endless vantage points, while hiking into the canyon itself - though requiring some effort - offers a unique and immersive experience.
Whether you have only a single day or a full two-day adventure, this guide will help you find the best photography spots in Bryce Canyon to ensure you capture its magic. PS. If you have only one sunrise then go straight to location 3 - Inspiration Point.
As usually all these places and lookouts are easily accessible by foot, public transport or by taxi/car. I also provided links to Google Maps and The Photographer's Ephemeris (TPE).
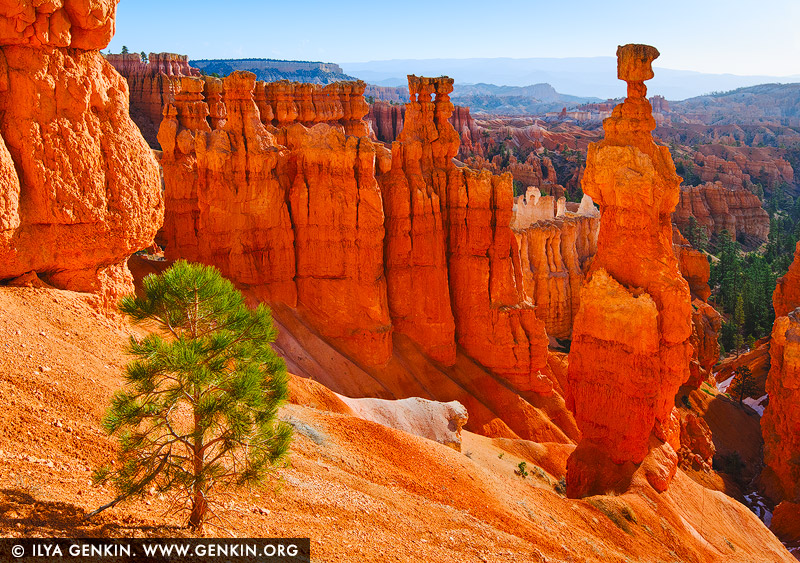
Location 1: Sunset Point
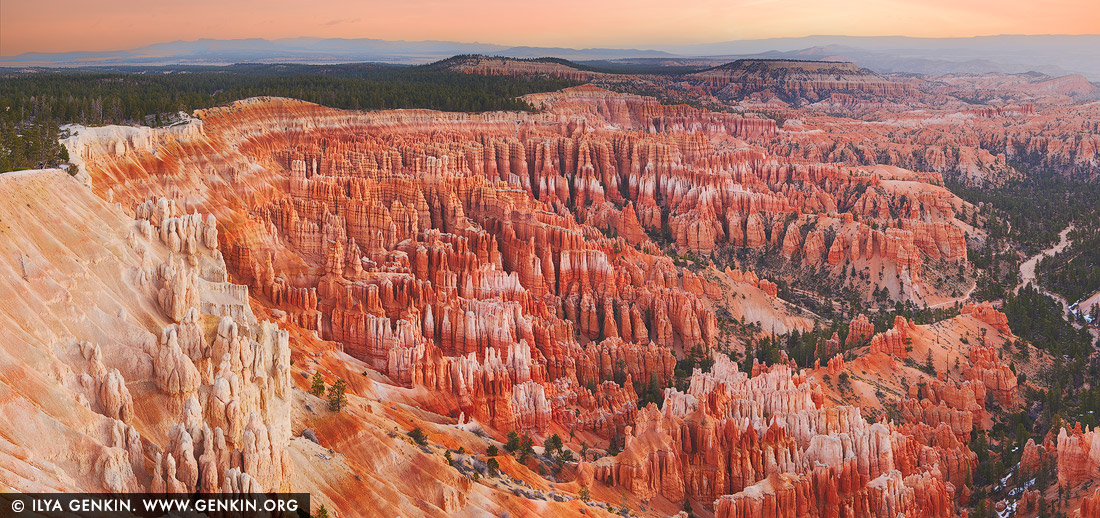
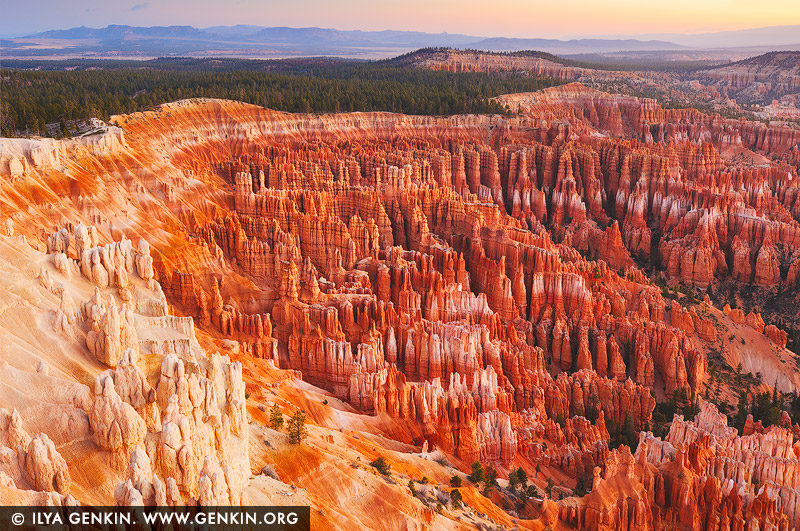
Bryce Amphitheatre at Sunset, Sunset Point, Bryce Canyon National Park, Utah, USA
Sunset Point is arguably the most iconic viewpoint in Bryce Canyon, offering a breathtaking panorama of the Silent City - a dense collection of towering hoodoos stretching into the distance. Located along the Rim Trail, it provides views extending toward Sunrise Point to the left and Inspiration and Bryce Points to the right. Despite its name, Sunset Point is excellent for both sunrise and sunset photography, though it remains the park's most popular viewpoint, meaning you won't have solitude. It's the best way to start the Navajo Loop Trail, and the Peek-A-Boo Loop Trail. If here at sunset, stick around after dark to watch the stars come out. You'll see more stars in Bryce than just about anywhere else.
Best Time to Photograph:
- Sunrise: While not as famous as Sunrise Point, early morning light casts long shadows and enhances the contrast of the hoodoos, bringing out their depth and texture.
- Golden Hour and Sunset: The golden light skims across the formations, intensifying their warm red and orange hues. The Silent City glows spectacularly just before the sun dips below the horizon.
Bryce Amphitheatre at Sunset, Sunset Point, Bryce Canyon National Park, Utah, USA
Recommended Lenses:
- Wide-Angle Lens (14-24mm, 16-35mm): Essential for capturing the vast amphitheatre and dramatic sky.
- Standard Lens (24-70mm): Great for balanced compositions that include hoodoos and sky.
- Telephoto Lens (70-200mm): Useful for isolating intricate rock formations and emphasising patterns within the Silent City.
Photography Tips:
- Arrive early to secure a good spot, especially at sunset when crowds gather.
- A polarising filter can deepen the blue sky and reduce glare on the rock formations.
- Bracket exposures to manage the high contrast between the sky and the canyon.
- Scenic Value:

- Photographic Interest:
- Road Difficulty:

- Trail Difficulty:
Sunset Point on maps:
Location 2: Sunrise Point
Bryce Amphitheatre, Sunrise Point, Bryce Canyon National Park, Utah, USA
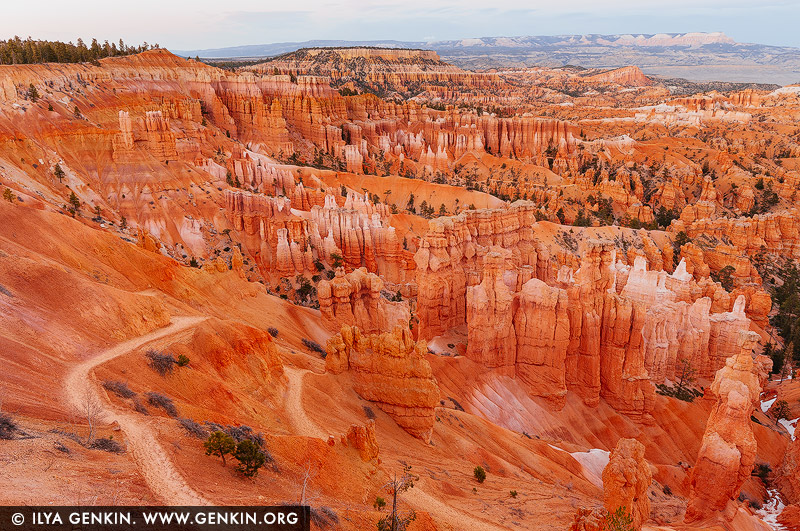
At an elevation of 8,100 feet / 2469 m, Sunrise Point offers a commanding view over a fairytale landscape of hoodoos. Though the formations are not as densely packed as those at Sunset Point, this location provides an excellent opportunity to isolate individual spires. One of the most famous formations visible from here is Queen Victoria, which overlooks the start of the Queens Garden Trail. In the distance, you'll see the Sinking Ship, and Boat Mesa. Notice the pinkish hues of the Aquarius Plateau in the background. The interplay of early morning light and long shadows makes this an exceptional location to witness the canyon come to life.
From here, you can access the Queens Garden Trail, the Navajo Loop, and the Fairyland Loop Trail.
Best Time to Photograph:
- Sunrise: As the sun rises in the east, the first light paints the hoodoos in a fiery glow, creating a striking contrast between illuminated and shadowed formations. Check your histogram for overexposure, which could wash out the colour of the spires. Within 30 minutes, the colours cool, shadows will shorten, and the dramatic contrast fades.
Recommended Lenses:
- Wide-Angle Lens (14-24mm, 16-35mm): Ideal for capturing the vast amphitheatre bathed in golden light.
- Normal Lens (24-70mm): Great for framing clusters of hoodoos and balancing foreground elements.
- Telephoto Lens (70-200mm): Perfect for isolating individual formations and creating compressed perspectives of the landscape.
Photography Tips:
- Dress warmly—mornings at this elevation can be chilly.
- Arrive at least 30 minutes before sunrise to set up and adjust your composition.
- Experiment with vertical compositions to emphasise the towering nature of the hoodoos.
- Consider using a polarising or graduated neutral density filter to manage bright skies and enhance colours.
- Adding a foreground element, such as a tree or a person, can provide scale and depth to your images.
Both Sunset and Sunrise Points are must-visit locations for any photographer in Bryce Canyon. By planning around the best lighting conditions and using the right equipment, you'll be able to capture the park's unique formations at their most breathtaking moments.
- Scenic Value:
- Photographic Interest:
- Road Difficulty:
- Trail Difficulty:
Sunrise Point on maps:
Location 3: Inspiration Point
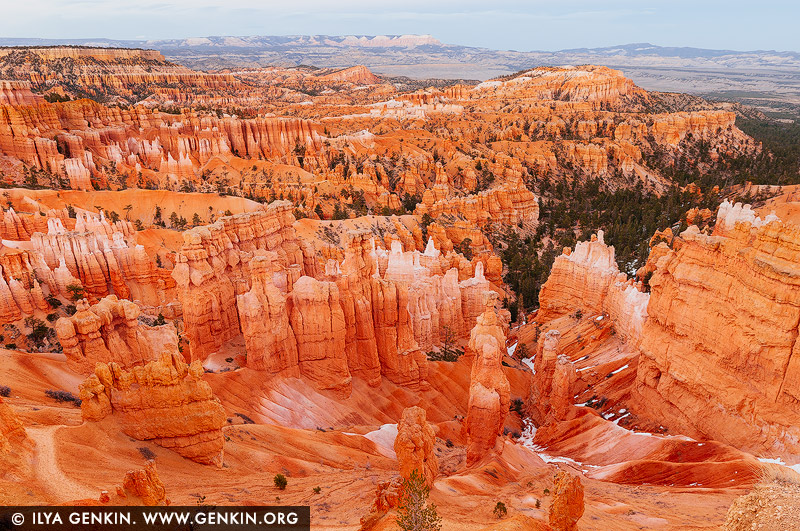
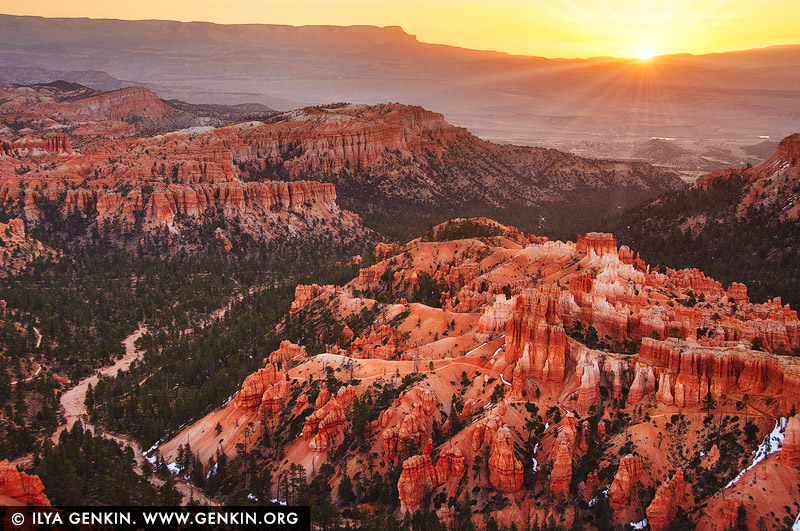
Bryce Amphitheatre at Sunrise, Inspiration Point, Bryce Canyon National Park, Utah, USA
Inspiration Point provides one of the most awe-inspiring views in Bryce Canyon, offering a sweeping perspective of the Silent City - a dense, intricate collection of hoodoos nestled within the amphitheatre. Located south of Sunset Point, it consists of three viewing levels, each offering a slightly different perspective. The upper level, in particular, presents a nearly aerial view, emphasising the vastness and depth of the canyon. The Rim Trail between Sunset and Inspiration Point is a leisurely 20-minute walk, providing continuous breathtaking vistas. Compared to more popular spots like Sunset Point, Inspiration Point tends to be less crowded, making it an excellent choice for photographers seeking a more tranquil setting. It's my personal most favourite spot. If I have to choose only one location to visit then it will be the Upper Inspiration Point. It offers full amphitheatre view as well as plenty of opportunities to isolate individual hoodoos and formations and create compressed perspectives of the landscape.
Best Time to Photograph:
- Sunrise: The hoodoos catch the first light beautifully, with long shadows adding depth and dimension to the formations.
- Late Afternoon: While not as dramatic as sunrise, late afternoon light can still enhance the warm tones of the rock formations.
Bryce Canyon Hoodoos at Sunrise, Inspiration Point, Bryce Canyon National Park, Utah, USA
Recommended Lenses:
- Wide-Angle Lens (14-24mm, 16-35mm): Perfect for capturing the grandeur of the amphitheatre.
- Normal Lens (24-70mm): Great for framing interesting clusters of hoodoos.
- Telephoto Lens (70-200mm): Useful for isolating rock formations and compressing the layers of hoodoos into dramatic compositions.
Photography Tips:
- If the view at the main platform doesn't fully impress you, head to the upper viewpoint for a more expansive perspective.
- Turn back toward Sunset Point to capture an alternate view of Boat Mesa and the Silent City.
- Arrive at least 30 minutes before sunrise to capture the changing light and evolving colours.
- Scenic Value:
- Photographic Interest:
- Road Difficulty:
- Trail Difficulty:
Inspiration Point (lower) on maps:
Inspiration Point (upper) on maps:
Location 4: Bryce Point
Bryce Canyon at Sunrise, Bryce Canyon National Park, Utah, USA
Bryce Point is one of the most spectacular sunrise locations in the park, offering a commanding panoramic view of the entire amphitheatre. Positioned higher than most other viewpoints, it allows you to see the hoodoos stretching far into the distance, with the rising sun casting a golden glow over the formations. This viewpoint is also the starting point for several hiking trails, including the end of the Rim Trail, the "backdoor" to the Peek-A-Boo Loop Trail, and the beginning of the Under-the-Rim Trail.
Best Time to Photograph:
- Sunrise: Bryce Point is one of the best locations in the park for sunrise photography. The amphitheatre faces east, and the hoodoos glow as the first rays of sunlight illuminate them.
- Mid-Morning: As the sun rises higher, light fills the amphitheatre, offering different photographic opportunities with softer shadows.
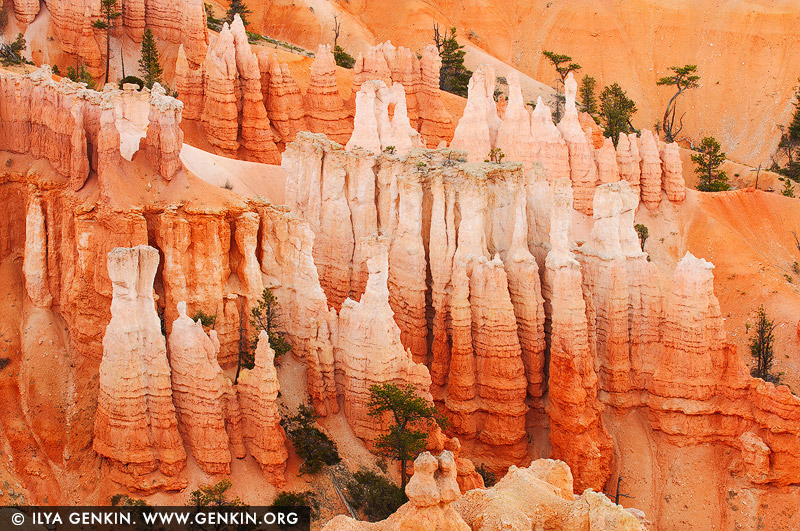
Hoodoos, Bryce Canyon National Park, Utah, USA
Recommended Lenses:
- Wide-Angle Lens (14-24mm, 16-35mm): Essential for capturing the sweeping amphitheatre and sky.
- Standard Lens (24-70mm): Helps frame balanced compositions with hoodoos in the foreground and the vast landscape beyond.
- Telephoto Lens (70-200mm): Ideal for isolating details and patterns in the intricate hoodoo formations.
Photography Tips:
- Arrive well before sunrise to secure a good spot, as this location is very popular among photographers.
- Use a tripod to stabilise your shots in low light and capture the full range of colours in the early morning sky.
- Consider using a graduated neutral density filter to balance the bright sky and darker canyon.
- Scenic Value:

- Photographic Interest:

- Road Difficulty:
- Trail Difficulty:
Bryce Point on maps:
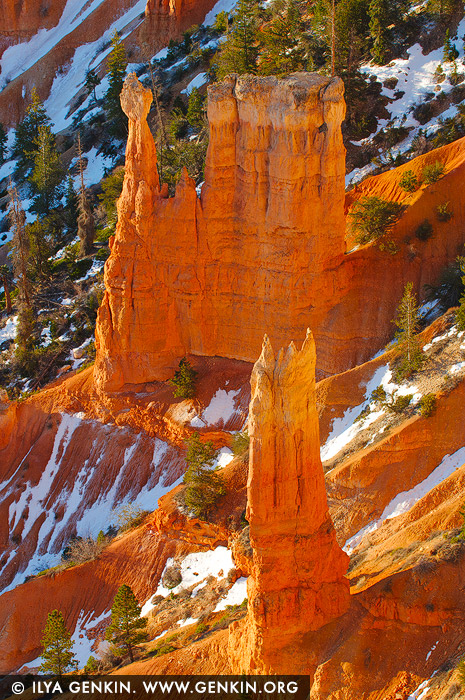
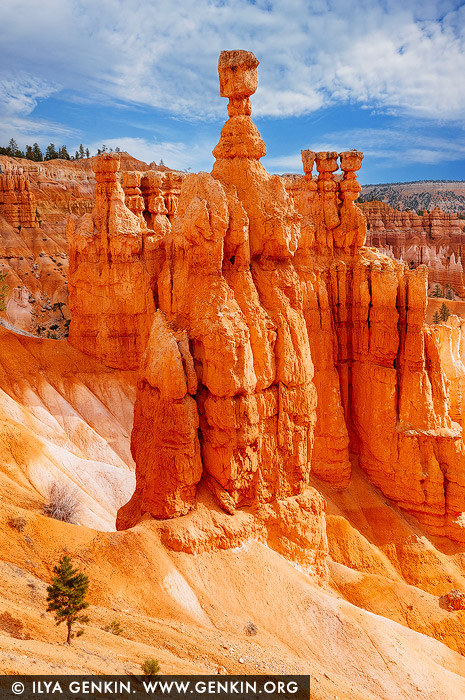
Location 5: Navajo Trail
Sunrise at Thor's Hammer, Sunset Point, Navajo Loop Trail, Bryce Canyon National Park, Utah, USA
To truly experience and capture the magic of Bryce Canyon, a descent into the amphitheatre is essential, and the Navajo Trail is one of the best hikes for photographers. Beginning at Sunset Point, this 1.3-mile / 2.16 km loop descends 550 feet / 167 m into the heart of the canyon, passing some of Bryce's most iconic formations, including Thor's Hammer, Two Bridges, and the towering sandstone cliffs of Wall Street. The dramatic switchbacks lead into a narrow slot canyon, where sheer limestone walls rise above, framing the sky and creating striking compositions. If combined with the Queens Garden Trail, the hike extends to a 3-mile / 4.8 km loop, offering an even greater variety of photographic opportunities.
Best Time to Photograph:
The Navajo Trail is best photographed in the early morning or late afternoon when the low-angle light enhances the warm tones of the rock formations and deepens shadows for added contrast. Sunrise is especially stunning at Sunset Point, where Thor's Hammer catches the first light of the day. If hiking in the afternoon, be mindful that Wall Street's slot canyon section falls into shadow earlier than the rest of the trail, making for moodier, high-contrast images.
Sunrise at Thor's Hammer, Sunset Point, Navajo Loop Trail, Bryce Canyon National Park, Utah, USA
Recommended Lenses:
- Wide-Angle Lens (16-35mm): Ideal for capturing the towering hoodoos, switchbacks, and narrow canyon walls in Wall Street.
- Standard Lens (24-70mm): Great for more general compositions, particularly when photographing Thor's Hammer or framing hikers within the canyon.
- Telephoto Lens (70-200mm): Useful for isolating details, such as patterns in the rock formations or hikers against the dramatic landscape.
Trail Considerations:
At an elevation of 8,000 feet / 2438 m, the thin air can make hiking more strenuous, so take your time, especially on the steep ascent back to the rim. The trail is mostly sun-exposed, except for the shaded sections of Wall Street, so be sure to bring water, sunscreen, and a hat. In winter, the trail is often covered in snow and ice, making traction devices essential for a safe descent.
For those seeking to add an extra dimension to their Bryce Canyon portfolio, the Navajo Trail provides an immersive experience, allowing you to photograph the hoodoos from below the rim—a perspective that few visitors capture. Whether you're shooting dramatic landscapes, intimate details, or hikers navigating the winding switchbacks, this trail offers endless opportunities for compelling imagery.
- Scenic Value:
- Photographic Interest:
- Road Difficulty:
- Trail Difficulty:

Navajo Trail on maps:
Photographing Bryce Canyon at Midday
Midday is the least ideal time for photography in Bryce Canyon, as the overhead sun creates harsh lighting, minimal shadows, and washed-out colours. The intricate hoodoo formations, which rely on contrast and directional light to reveal their texture and depth, tend to blend together under the intense, direct sunlight. If you visit Bryce only during midday, capturing professional-quality images will be challenging.
However, that doesn't mean photography is impossible - it just requires a different approach. Instead of shooting from the rim, where the formations appear flat and lack depth, take advantage of Bryce Canyon's extensive trail network and descend into the amphitheatre. By hiking below the rim and shooting upward, you can incorporate shadows, increase contrast, and add a sense of scale to your images. The Navajo Loop Trail, beginning at Sunset Point, is a great option, offering a short but rewarding 1.5-mile / 2.4 km hike that winds through some of Bryce's most striking formations.
To avoid overexposed, washed-out images, consider using a polarising filter to deepen the blue sky and reduce glare on the rock surfaces. A lens hood can also help minimise lens flare in the bright midday sun. If you must shoot from the rim, look for shaded areas or wait for passing clouds to soften the light.
For the best photographic results, plan your visit around sunrise and sunset, when the low-angle light enhances the colour and texture of the formations. Use the midday hours to explore the trails, scout new locations, or take a break before returning for the golden-hour glow that transforms Bryce Canyon into a photographer's dream.
Photographing Bryce Canyon in Winter
If you want to add the perfect finishing touch to your Bryce Canyon images, visiting in winter is like putting frosting on the cake. A fresh dusting of snow - or deep drifts blanketing the hoodoos - creates a striking contrast against the canyon's fiery red and orange rock formations. The interplay of white snow, deep blue winter skies, and warm golden light makes for truly spectacular compositions. Winter also brings a sense of solitude, with fewer visitors braving the cold, allowing for a more peaceful and immersive photography experience. The best times to shoot remain sunrise and sunset, when the soft light enhances the texture of the snow-covered formations. Be prepared for icy trails and frigid temperatures, and use a sturdy tripod to stabilise shots in potentially windy conditions. With the right preparation, winter photography at Bryce Canyon offers some of the most magical and unique images you can capture.
Where to Stay Near Bryce Canyon National Park
For the best access to Bryce Canyon's stunning viewpoints, Bryce Canyon Lodge is the top choice. Located just a short walk from Sunrise Point, the lodge offers 70 rooms, 40 rustic cabins, and a quality restaurant. However, it is only open seasonally from May 1 to October 15, and its rates are among the highest in the area. For those visiting outside this window or seeking more budget-friendly options, a variety of motels and lodges can be found just outside the park entrance in Bryce Canyon City. Many of these accommodations, such as Best Western Plus Ruby's Inn, Bryce Canyon Resort, and Bryce View Lodge, operate year-round and offer comfortable stays with convenient access to dining and other amenities. Whether you prefer the historic charm of the lodge or the affordability and availability of nearby motels, staying close to the park ensures you can maximise your time capturing Bryce Canyon's breathtaking landscapes.
Useful Maps:
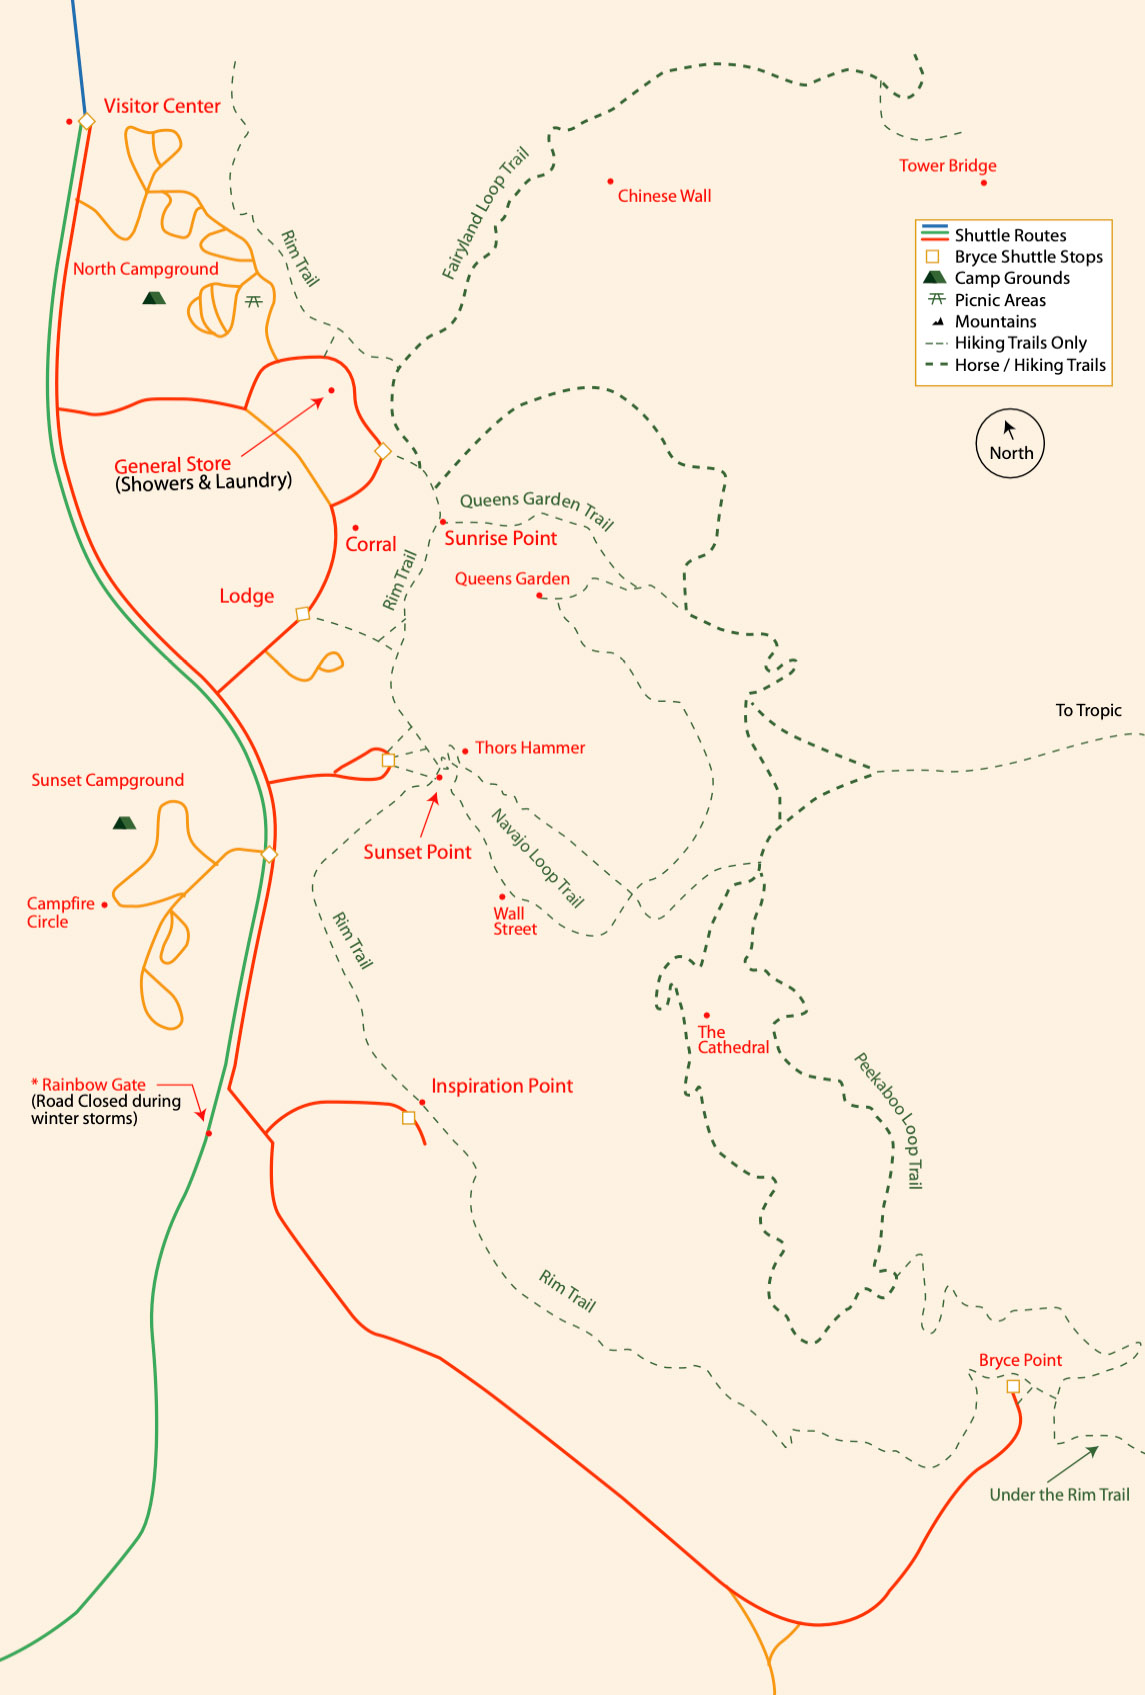
Detailed map of the Bryce Canyon main area. Click on the image to enlarge the map.
- Bryce Canyon National Park Map 4.1Mb (pdf, highly detailed)
- Bryce Canyon Main Area Detailed Map 5.2Mb (pdf, highly detailed)
For in-depth information on all photography locations in Bryce Canyon National Park, I highly recommend Photographing the Southwest: Vol. 1 - A Guide to the natural Landmarks of Southern Utah by Laurent Martres.
Ratings
|
Rating |
Scenic Value |
|
|
Of no particular interest |
 |
Mildly interesting, visit if nearby and/or time permitting |
|
|
Scenic location, worthy of a visit |
|
|
Very interesting, scenic or original location |
|
|
Remarkably scenic or rewarding location, a highlight |
|
|
Word-class location, absolutely tops |
|
Rating |
Photographic Interest |
|
|
Of no particular photographic interest |
|
|
Worth of quick photo |
|
|
Good photo opportunity |
|
|
Good photographic potential and scenic subjects |
|
|
Outstanding photographic potential, highly original or scenic subject |
|
|
Worls-class photographic location, "photographer's dream" |
|
Rating |
Road Difficulty |
|
|
Paved road, accessible to all normal-size vehicles |
|
|
Dirt road accessible without difficulty by a passenger car (under normal conditions) |
|
|
Minor obstacles, accessible by passenger car with caution (under good conditions) |
|
|
High-clearance required, but no major difficulty |
|
|
High-clearance 4WD required, some obstacles, no real danger |
|
|
High-clearance 4WD required, some risk to vehicle & passenges, experienced drivers only |
|
Rating |
Trail Difficulty |
|
|
No or very little walking (close to parking area) |
|
|
Easy short walk (<= 1h r/t), for everybody |
|
|
Moderate hike (1 to 3hr r/t) with no major difficulty or short hike with some minor difficulties |
|
|
Moderate to strenuous (3 to 6hr r/t) and/or difficulties (evevation gain, difficult terrain, some risks) |
|
|
Strenuous (>6h r/t) and/or globally difficult (evevation gain, difficult off-terrain, obstacles, risks) |
|
|
Backpacking required or for extremely fit dayhikers |
Fine Art Prints Australia
Shop online, drop an email or call us. Ilya Genkin Photography is your one-stop online store for all your wall art needs. Internationally recognised photography artist, Ilya Genkin creates beautiful photographic images to transform any home or office into an amazing and inspiring space. Ilya's works are available to fine art collectors as stretched and non-stretched canvases as well as the highest-quality fine-art photographic paper prints. Whether you're looking to add a touch of nature to your living room, create a relaxing ambiance in your bedroom, or spruce up your office space, our extensive collection of wall art has something for everyone. With our user-friendly website, it's easy to browse our selection, find the perfect piece, and have it delivered straight to your doorstep. Ask now about a mockup to show how your chosen Ilya Genkin photograph will transform your space into something amazing and stunning. So why wait? Start exploring our collection today and transform your space with our stunning wall art.
Artworks for Interior Designers, Home Stylists, and Architects
Ilya Genkin’s Print Collection is a range of affordable art pieces which can also be purposely modified and reproduced to match the interior stylings and colours of your project. All artworks are 'made to order' only. Pricing will depend on the sizes of artwork ordered, the number of pieces in each order and freight costs involved. Please feel free to contact us to discuss your requirements and we can arrange a quote for you.
By supporting Ilya Genkin Photography, you're not only indulging in the joy of owning exceptional art, but you're also empowering an independent artist and a small local business. Each purchase directly contributes to the growth and success of an Australian talent, nurturing a vibrant and diverse art community in our country.
Fine Art Landscape Photography
Information
Photography Guides
Online Store Opens 24/7
Email:
info@genkin.org
Phone: +61 (0) 421 055 613
Ilya Genkin Photography acknowledges the Traditional Custodians of the land on which we operate, live and gather as employees, and recognise their continuing connection to land, water and community. We pay respect to Elders past, present and emerging.